 五隆兴科技发展有限公司
Preparation for reinforcement installation and construction
Before binding reinforcement on site, first clean up the garbage on the cushion and in the formwork. When binding, draw the position line of reinforcement on the formwork first: the bottom plate reinforcement shall be marked on the cushion; Wall plate reinforcement shall be scribed on the formwork; The column stirrup shall be marked on two diagonal lines, and the beam stirrup shall be marked on the erection reinforcement.
After the formwork working face is cleaned, it shall be delivered to the reinforcement team as a whole
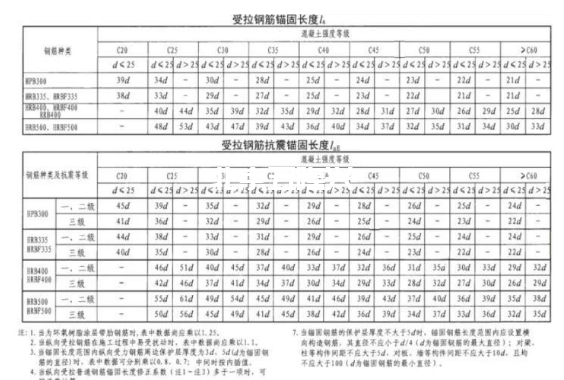
Reinforcement anchorage requirements
The minimum anchorage length La and seismic anchorage length Lae of tensile reinforcement shall meet the requirements of 16g101-1:
Wall reinforcement installation
(1) Binding of column reinforcement
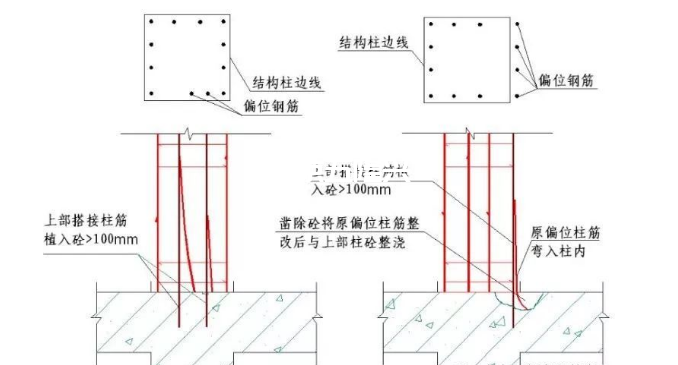
1. Pop up the column positioning control line on the floor concrete and check the column position. If the deviation of the main reinforcement exceeds the specification range, it shall be reported in time. After the technical director makes the treatment scheme, the construction shall be carried out according to the treatment scheme. It shall not be handled on site.
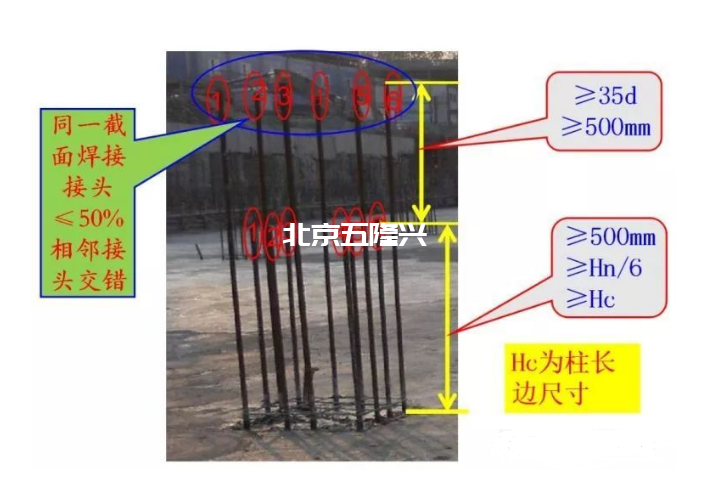
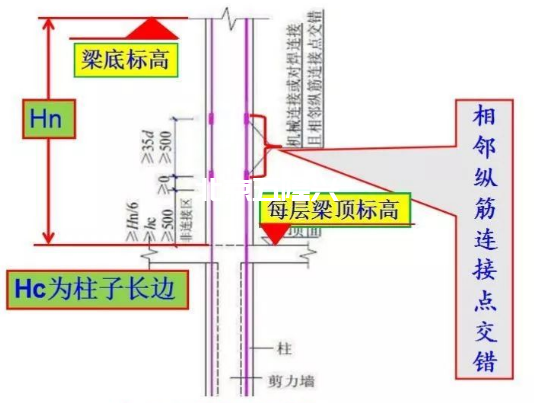
2. Set column stirrups: calculate the number of stirrups for each column according to the spacing required in the drawing. First set the stirrups on the lap bars protruding from the lower layer, and then weld the column reinforcement. The joints of stirrups (hook overlap) shall be staggered on the four corner longitudinal reinforcement.
3. Draw stirrup spacing points: draw stirrup spacing points with chalk on the welded column vertical reinforcement according to the drawing requirements.
4. Binding of column stirrups: move the sheathed stirrups upward according to the marked stirrup position line and bind them from top to bottom. It is advisable to bind them with buckles. The stirrup shall be perpendicular to the main reinforcement, the intersection of the stirrup corner and the main reinforcement shall be bound, and the intersection of the main reinforcement and the non corner part of the stirrup shall be bound in a plum blossom staggered manner. The overlap of hooks of stirrups shall be staggered along the column vertical bars and bound firmly. Stirrups at the upper and lower ends of the column shall be densified, and the length of the densified area and the spacing of stirrups in the densified area shall meet the requirements of the design drawings. When the design requires that the stirrup is provided with tie bar, the tie bar shall hook the stirrup.
5. Installation of column cushion blocks: plastic cushion blocks shall be used for columns, and the vertical and horizontal spacing shall not exceed 800mm, and the horizontal spacing shall not be less than 2.
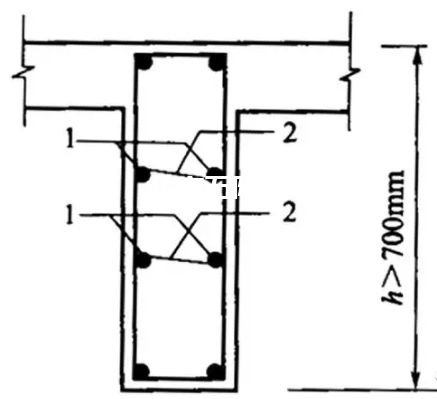

(2) Correct practice of longitudinal reinforcement lengthening
(3) Column reinforcement offset treatment node
(4) Structural requirements of variable section column
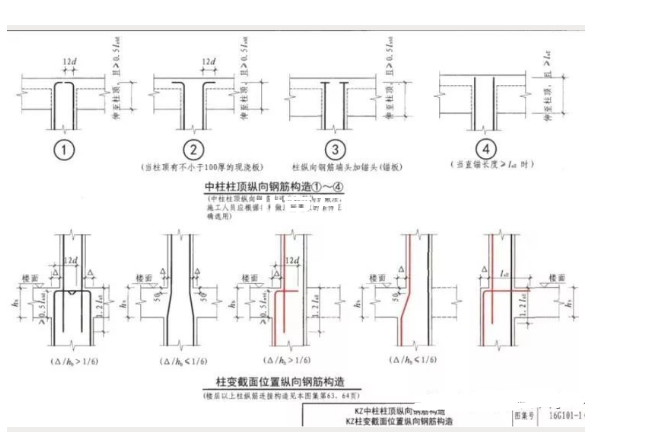
柱变截面位置纵向钢筋构造
(5) Structural requirements for column stirrup densification
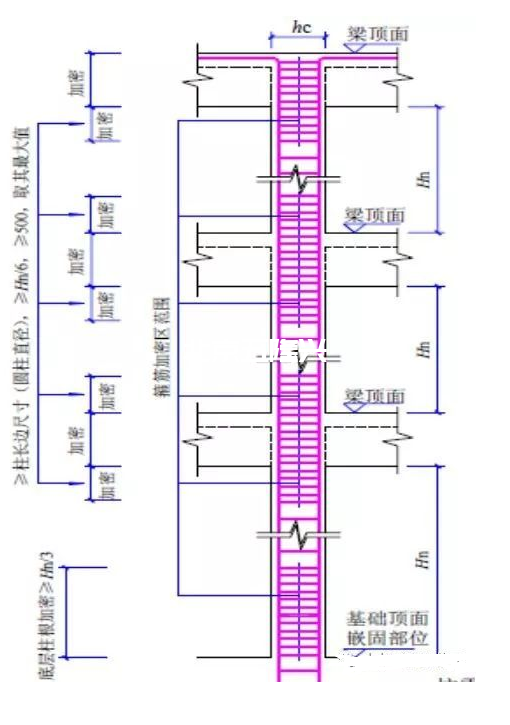
(6) Range of column stirrup densification area

(7) Core stirrup requirement method
(8) Setting requirements for cushion block of reinforcement protective layer
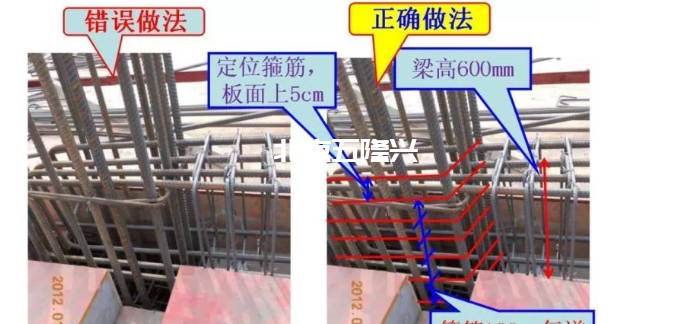
(10) Positioning hoop setting requirements
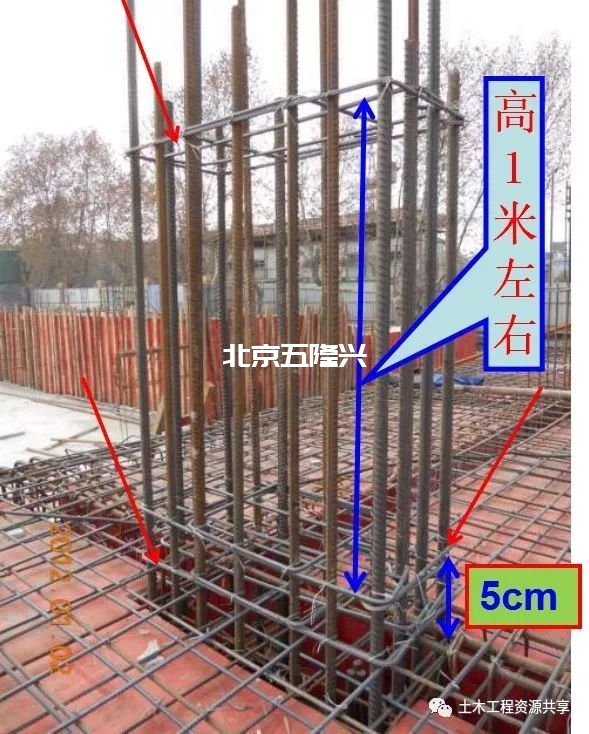
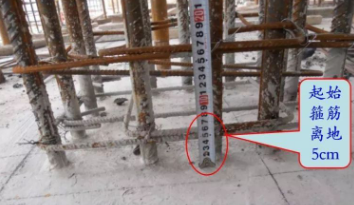
(11) Initial stirrup of column
Wall reinforcement installation
1. Snap the position lines of wall body and door and window openings on the floor concrete, and correct the embedded joint reinforcement again. If there is displacement, it shall be treated with the main reinforcement of the column.
2. Placement sequence of distribution bars in the wall body: the vertical bar spacing card shall be bound first, and the vertical distribution bars required for the wall body shall be placed at the side of the wall column and slightly fixed with the wall column. Then tie the horizontal bar spacing clamp, and then fix the horizontal distribution bar on the wall from top to bottom. Finally, fix the longitudinal distribution reinforcement.
3. The wall reinforcement is a two-way stressed reinforcement. All reinforcement intersections shall be bound point by point, and their overlapping degree and position shall meet the requirements of the design drawings and construction specifications. In order to ensure that the wall reinforcement will not shift during concrete pouring, a wall reinforcement positioning frame welded with A8 reinforcement is proposed to be set on the top of each floor for the positioning of the relative position between the two layers of reinforcement and the positioning of a single reinforcement.
4. In order to ensure the correct elevation position of door and window openings, mark the elevation line on the vertical reinforcement of the openings. The door and window openings shall be bound with coupling beam reinforcement according to the design requirements, and the length anchored into the wall shall meet the design requirements. In addition, cooperate with other types of work to install embedded pipe fittings and reserved holes, and their positions and elevations shall meet the design requirements.
5. The wall reinforcement cushion block adopts plastic cushion block, which is arranged in quincunx shape, and the vertical and horizontal spacing shall not exceed 800 * 800mm.


